Programmers, who still prefer Classic Object-Oriented approach, experience difficulties working with most of markup languages either XAML or html. Visual Designers don't provide inheritance and profess template technologies.
We face this problem permanently, implementing big projects of migration applications from Visual FoxPro to c#. During long time complex visual class trees, came from VFP applications, were rewritten by hands as miles of WPF or Java Script code, and complex interface pictures built in mind only. And once we decided that situation should be changed.
"DataOdyssey WPF Visual" and "DataOdysset JS Visual" are Visual Studio extensions we use instear of XAML designer and html designer. First of them is prepared for publishing and accessible as VSIX package. Minimal Visual Studio version is 17.8 (VS 2022)
This extension does not fully implement VS document behaviour, and there are some inconvenience like separated "Save" button, navigation by "Go to declaration" absence and so. But this designer really help us working with complex class trees required inheritance.
Two of possible three ways to create new visual class are the same like in VFP:
And in addition you can
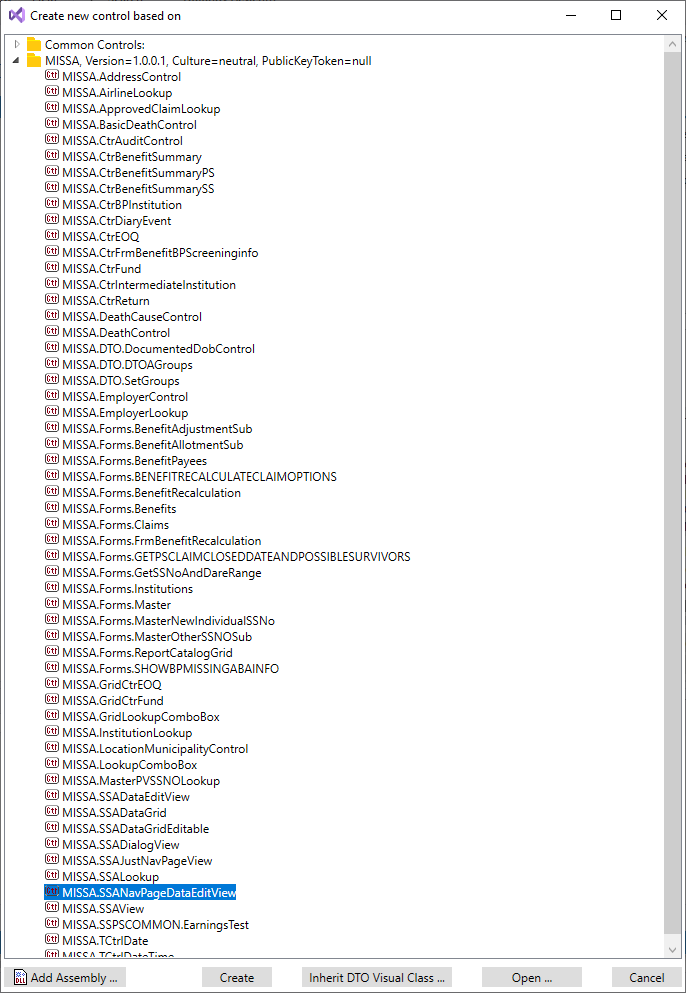
Open solution in Visual Studio and right click folder, where you going to create DataOdyssey Visual controls library. Then select "Add", then "DataOdyssey Visual Class"
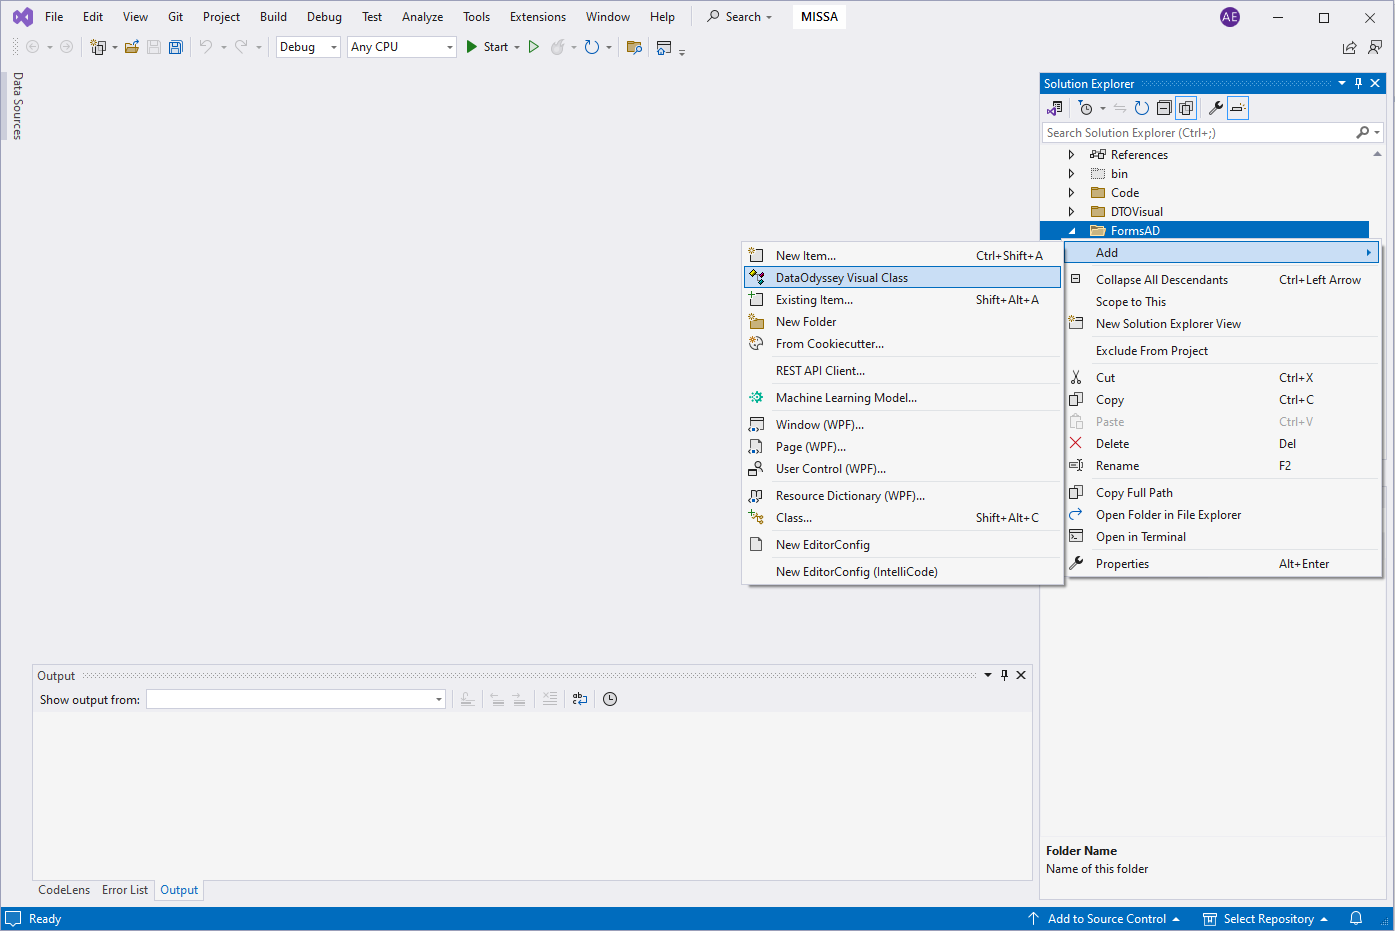
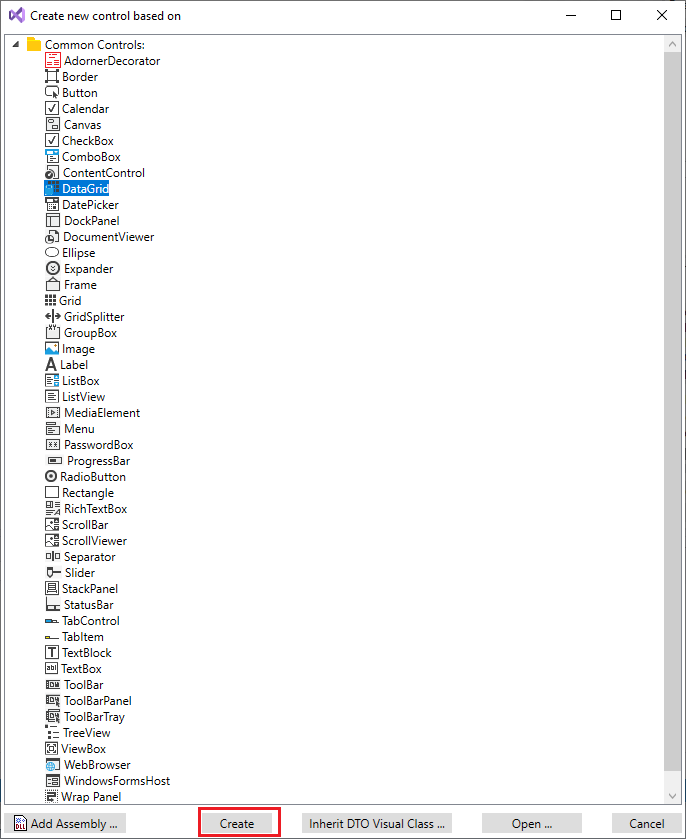
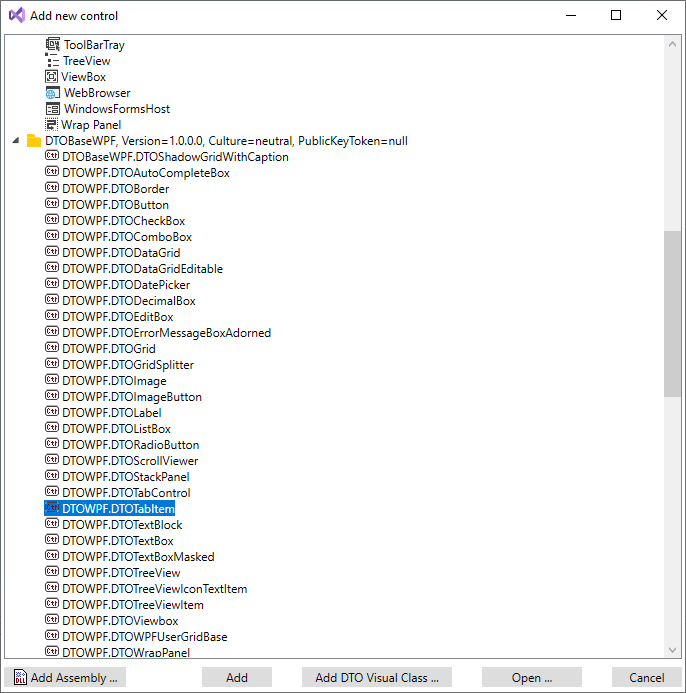
This dialog appears when you create new DataOdyssey Visual class (or add to existing library) or add children component into DataOdyssey Visual class. Initially the list of classes contains "base" WPF classes. Select class in the list and click "Create"
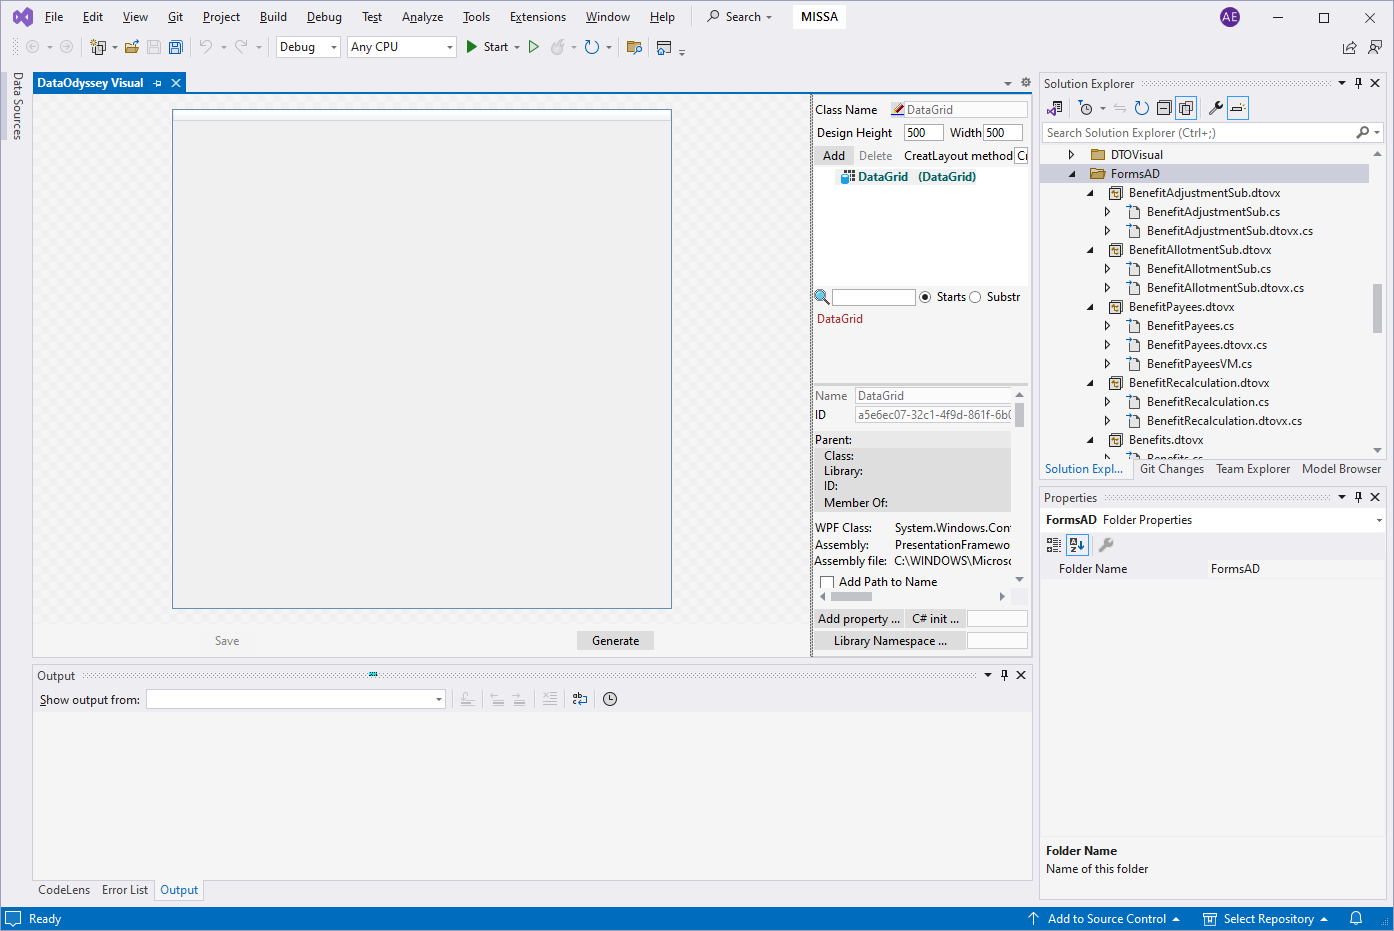
Class gets inherited and children class appears in the design area..
DataOdyssey Visual Designer does not provide working with forms. You create form content and insert into form writing code or in XAML file.
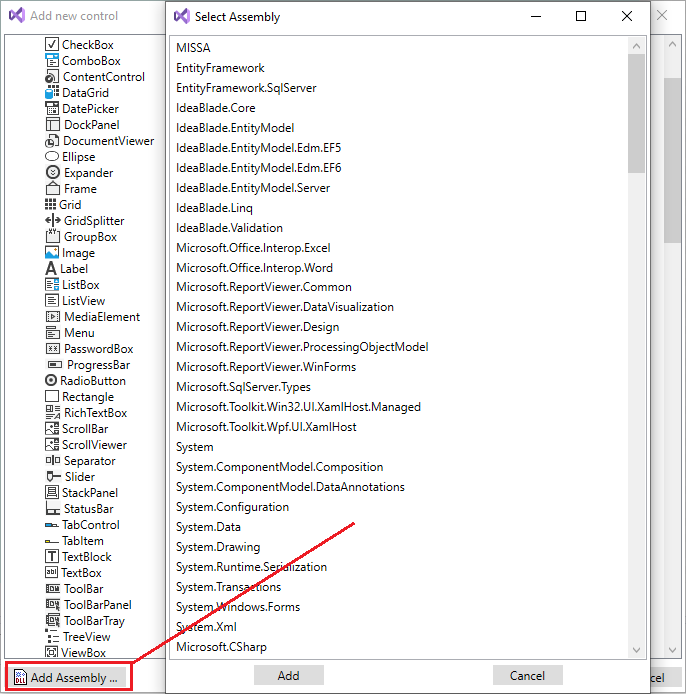
Assembly should be referenced in the VS project or can be VS Project of the current solution.
Click "Add Assembly..." to call list of available assemblies.
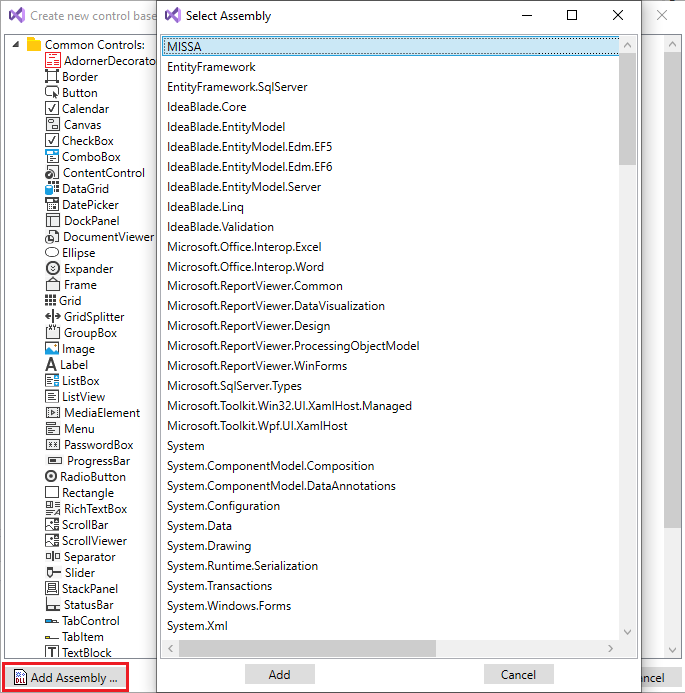
Select needed assembly and click "Add". Assembly appears in the Tree of Classes and contains the list of own WPF classes. Select class and click "Create".
Class gets inherited and children class appears in the design area..
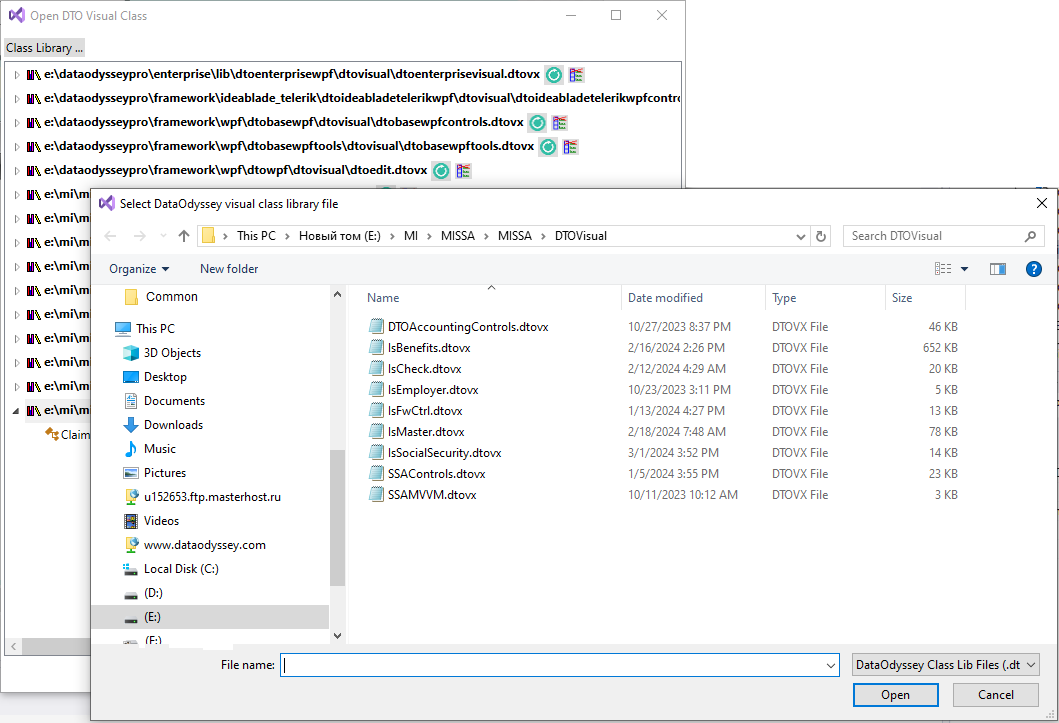
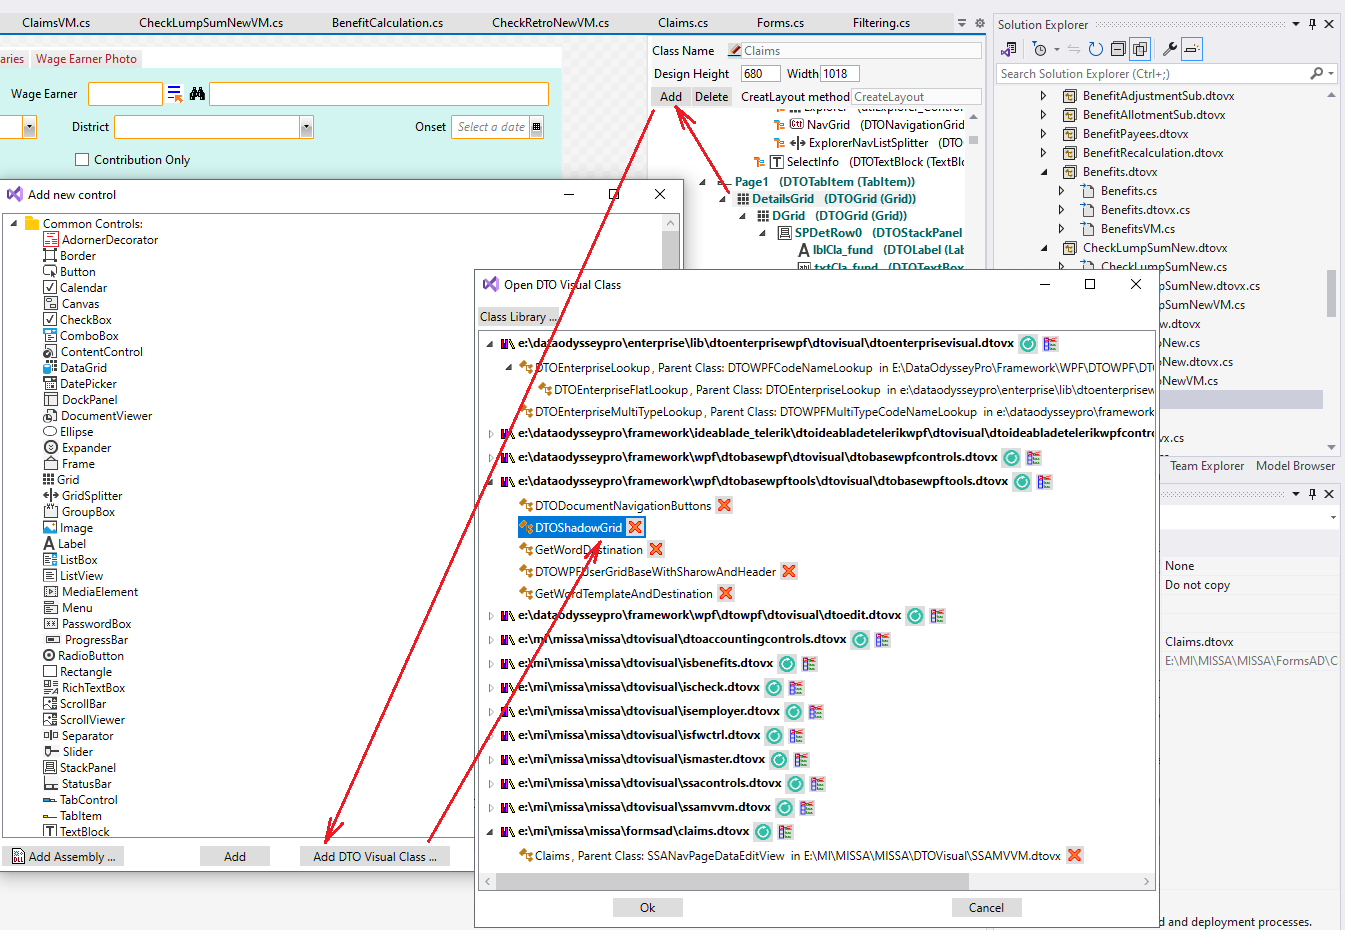
Click "Inherit DTO Visual class..." to call the list of recent DataOdyssey Visual class libraries.
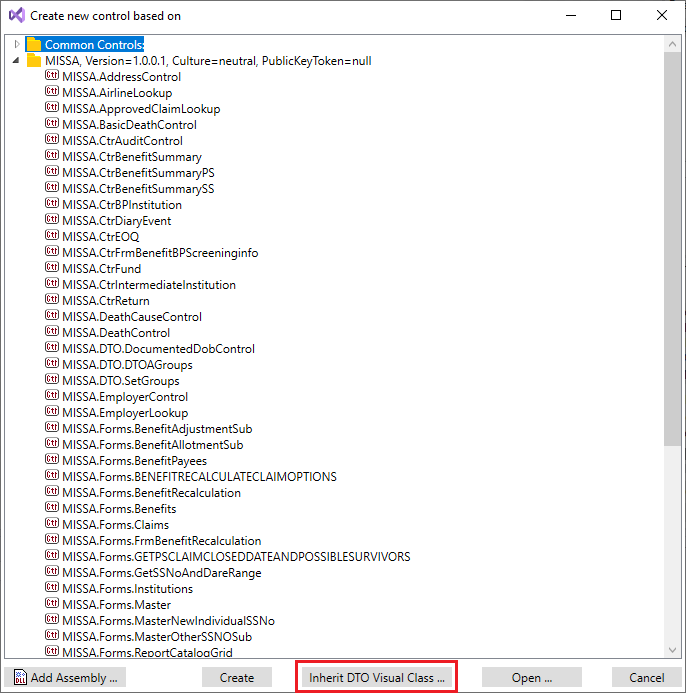
The tree of libraries contains DataOdyssey Visual classes.
If library absents in this list click "Class Library ...". File selection dialog appears. DataOdyssey Visual class library files have .dtovs extension. Find and select needed library created earlier.
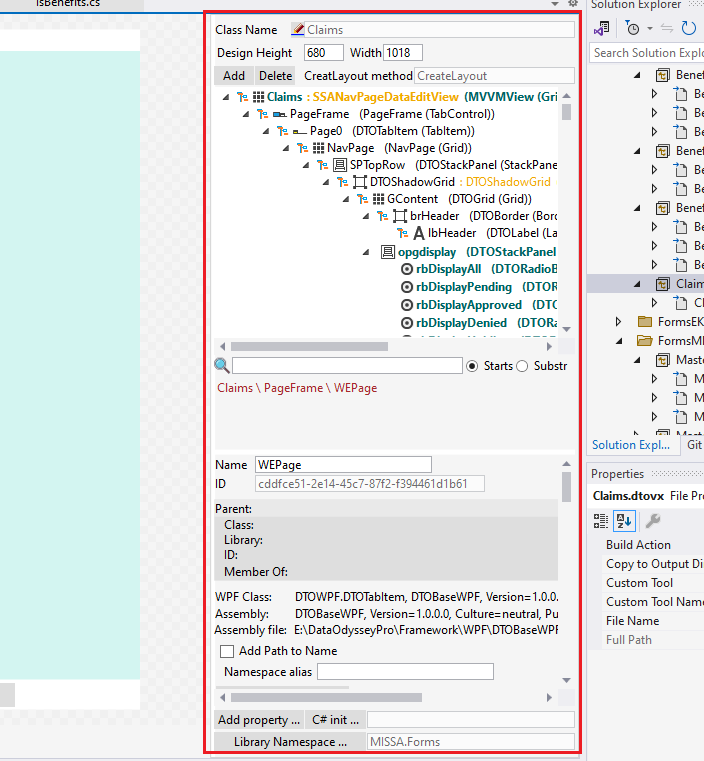
Pay atention to the parent class info shown in the Properties Panel (red box) and to available for editing the structure of inherited class (magenta rectangle)
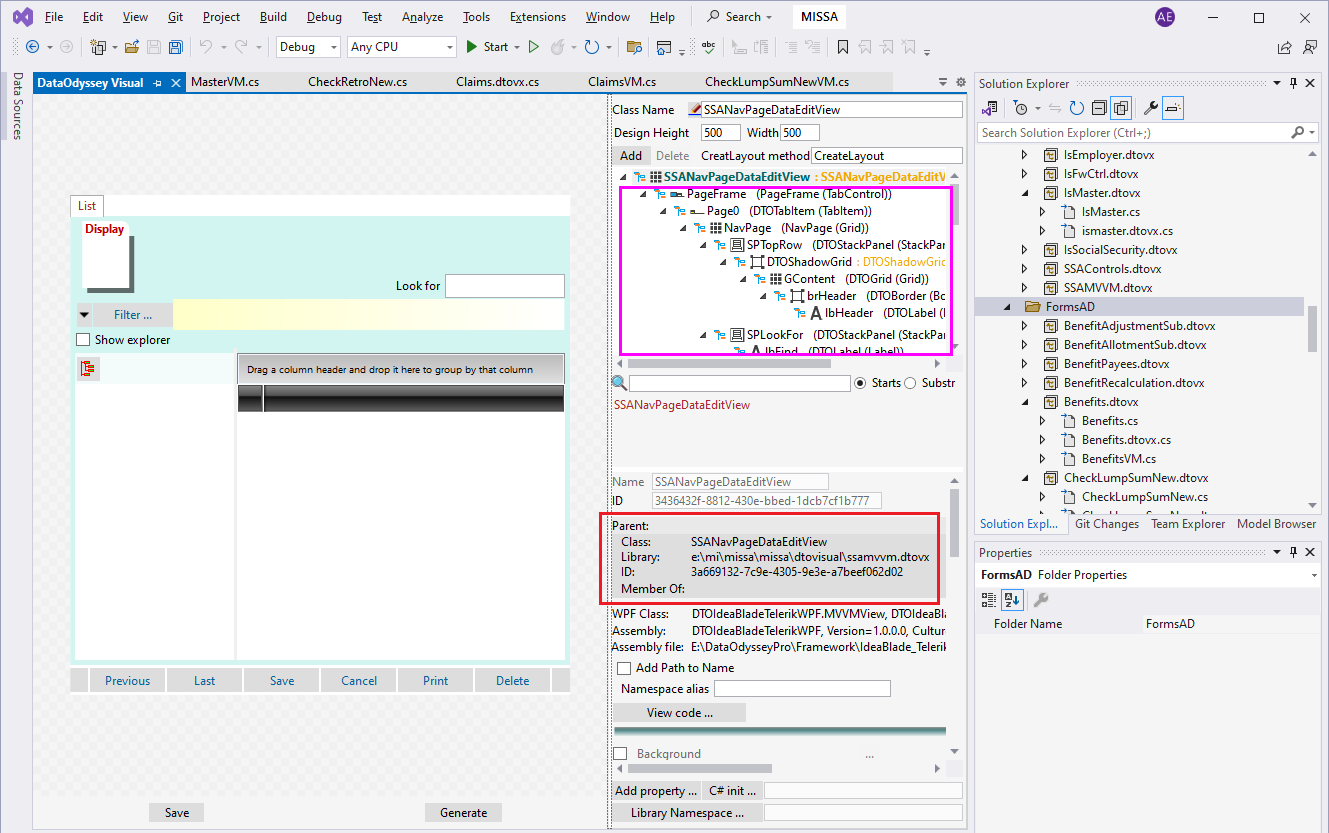
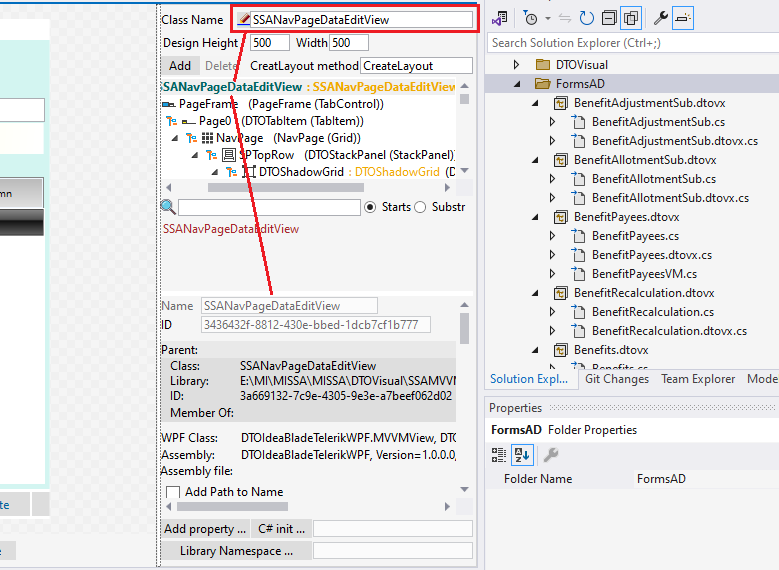
Class name is the same to the name of the root element and shown at top of class panel, in the name o first element of tree and in the Properties Panel, when root element is selected in the tree.
Class name is disabled when not empty. Click button at left to change.
As mentioned above, DataOdyssey Visual designer does not fully emplement Visual Studio document behavior. To save changes you must click "Save" button below design area.
First time, when you save new created class to a new library, designer shows two dialogs to enter:
DataOdyssey Visual class library has extension ".dtovx"
Each time, when you save changes, designer generated CS file with ".dtovs.cs" extension. File is attached to library class in the project.
To open .dtovx file in the DataOdyssey Visual Designer simply click tis one in the solution explorer (or double click). If .dtovx library contains several classes, designer will show dialog to select class. If this class is already opened in the designer, VS will navigate to window where class opened.
If VS opens .dtovx file as json (you've just ran VS), this means that DataOdyssey Visual extension is not loaded yet. Simply wait for VS loaded extension and try again.
If Width or/and Height of the root control is not set the size of design area should be defined below class name. Default is 500x500
Library namespace is shown at bottom of controls panel at right of the button with caption "Library Namespace ..." Button calls dialog with current namespace allowing to change this one.
Select parent control in the Controls Tree and Click "Add ..." button above tree, then select one of "base" WPF classes.
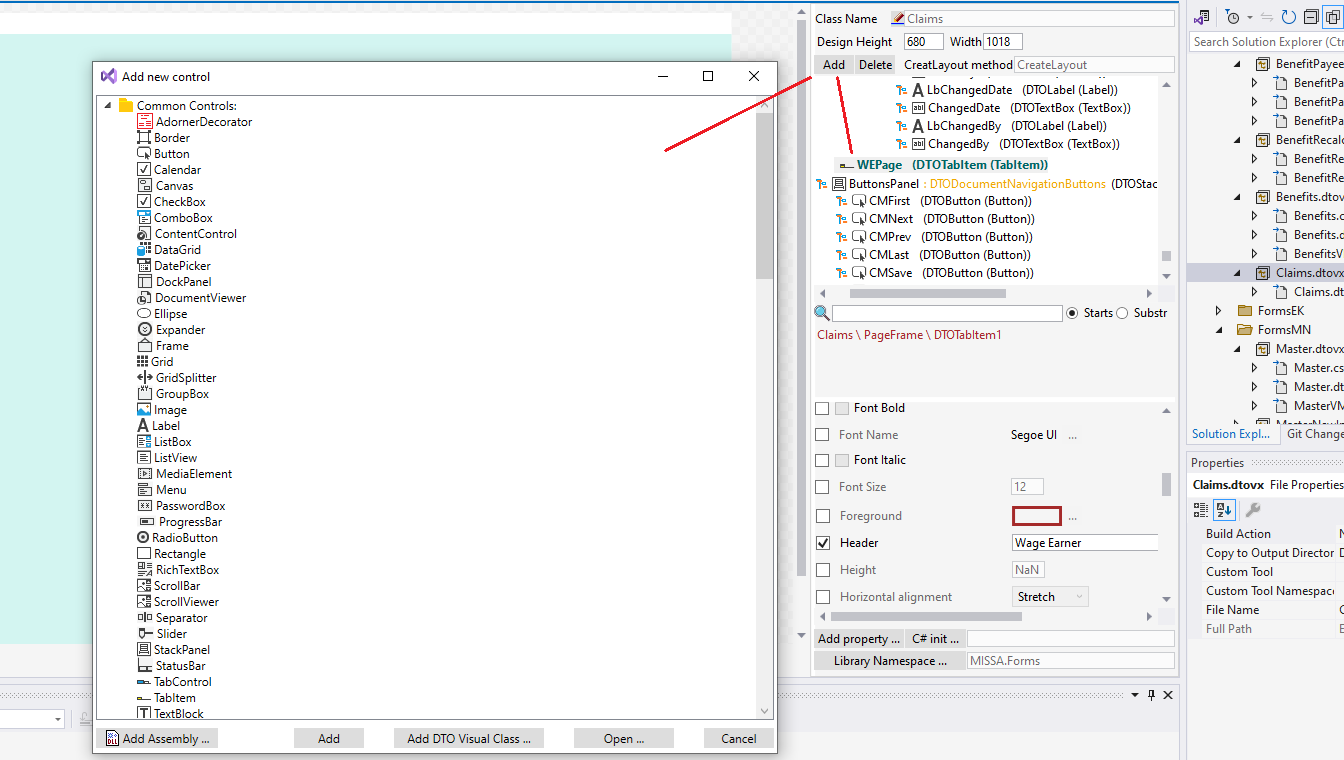
Select parent control in the Controls Tree and Click "Add ..." button above tree. List of available WPF classes is groped by "Common" and by assemblies. Expand needed assembly, find ans select class.
If assembly absences in the list, click "Add Assembly ..." button. New dialog list contains assemblies, referenced in the project, and projects of the solution.
Select parent control in the Controls Tree and Click "Add ..." button above tree. Then click "Add DTO Visual Class ...". The list of libraries appears. Do expand needed and select DataOdyssey Visual class created earlier.
If library absence in the list, click "Class Library ..." button above list. File open dialog appears. Find and select .dtovx file
There are two ways to create new class, based on existing DataOdyssey Visual class. As well as add existing DataOdyssey Visual class into another class.
First way gives you following advantaches:
So, do inherit DataOdyssey Visual class if this class in the same assembly, or you need to make major changes in the layout of the inherited class.
Assembly type inheritance also has advantaches:
Assembly type inheritance does not mean that you won't be able to change properties of controls of inherited class or move controls within tree of the designing class. In this case designer allows to extract needed control from the inherited classe and then to change properties or move this one.
Added controls always marked with bold font in the Controls Tree. But their subcontrols-members have normal font weight, and you can't change names of such members.
Also added and inherited controls have different icons.
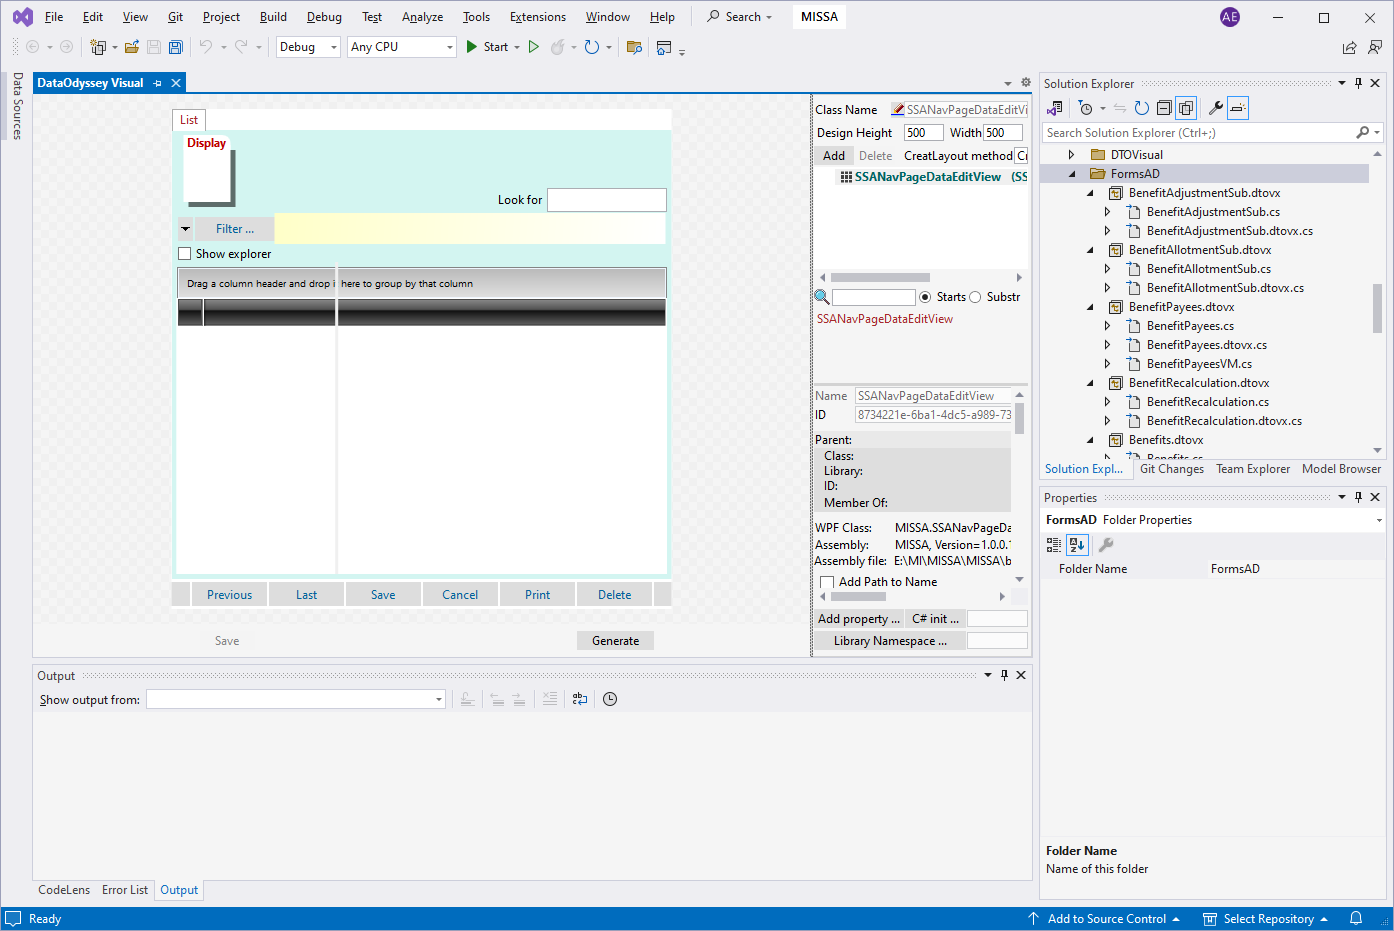
DataOdyssey Visual Designer window contains of Design Area at left and Control Panel at right.
At the top of Control Panel placed: class name textbox; design area size boxes; "Add..." and "Delete" buttons; and "CreateLayout" method name textbox with button to change.
A Tree of Controls represents the visual tree (not classes membership) and allocates a top half of the Control Panel.
The visual path of the selected in the tree control appears below tree when you click tree item.
A bottom half of Control Panel allocates Properties Panel, where designer places properties of the selected in the tree control and allows to change them.
At the bottom of Control Panel placed: button "Add Property ..." to add specific properties of the control to the Properties Panel; button "C# Init ..." to add a fragment of initialization code; and "Library Namespace" button and value.
Selected in the tree control info is shown below tree and selected control path, and contains of Control Properties and additional buttons set.
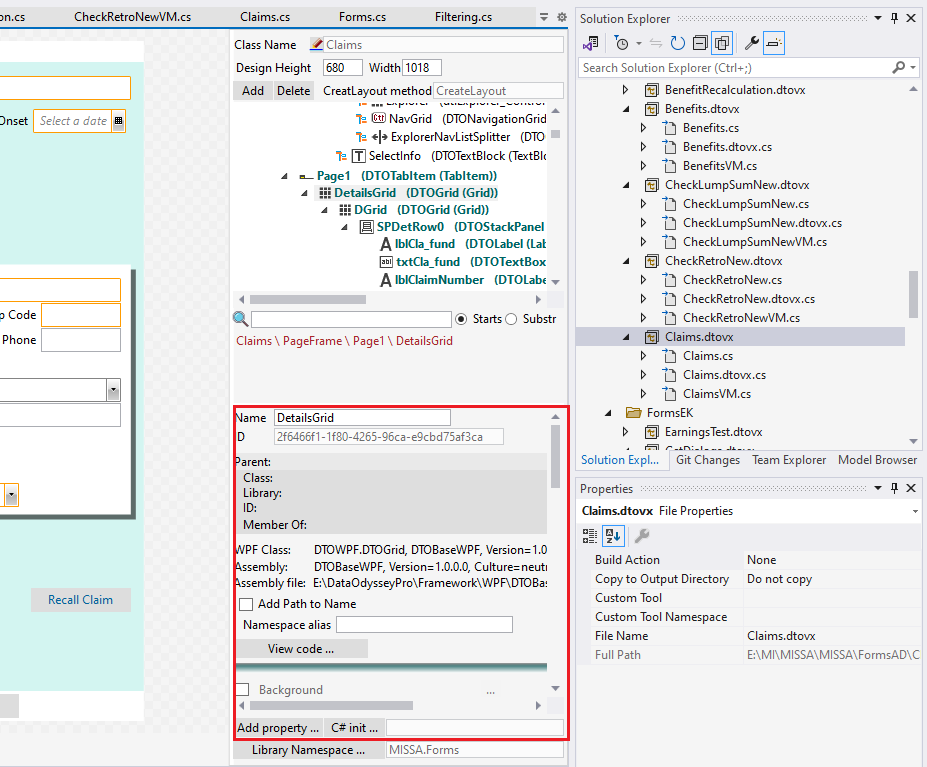
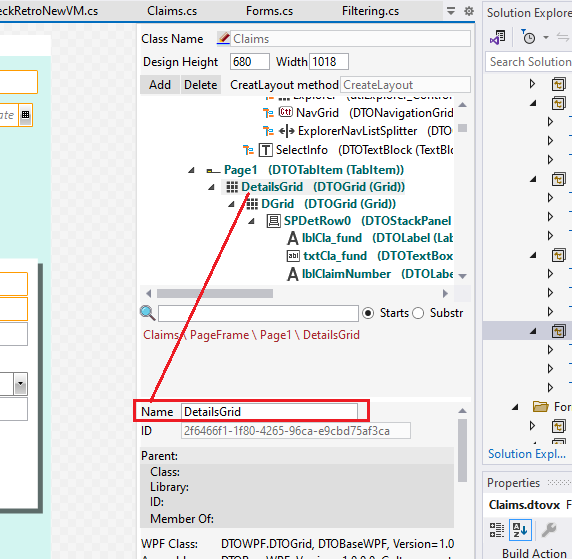
Controls Tree items starts with control names. The name of the selected in the tree item is placed at top of Control Properties scrolling area.
You may change control name, and DataOvyssey Designer will keep links to this control and class(if class name changed) within all .dtovx files, because of all links are based on the internal Guid keys.
But! You should open and resave all .dtovcx, which refer to changed control name to regenerate c# code, where all links are by control names only. C# compiler/linker will help and highlight broken references in the code.
And, certainly, all assemblies, which refer to this control(with changed name) will be broken, and you have to fix all lost links (compiler/linker will show as errors).
So, change control and class names for .dtovx files safe, but take a care on lost C# links.
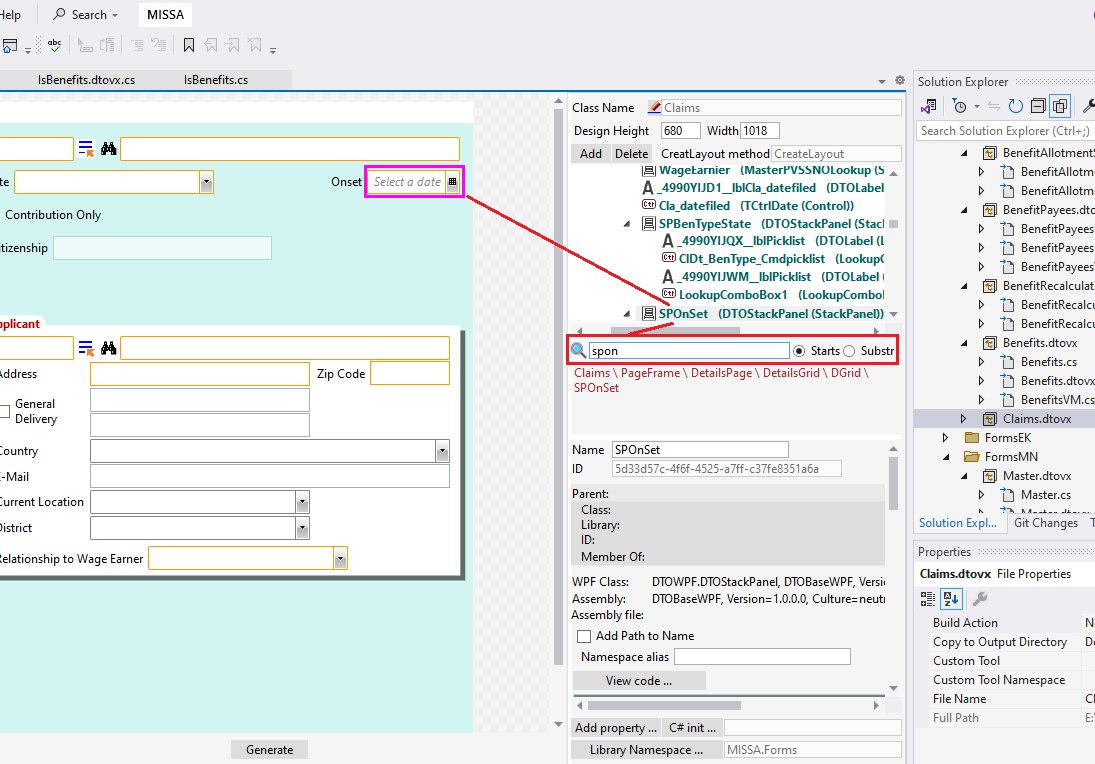
Controls tree can be very complex and you may find controls in the tree by their names. Also there are options to search by: "starts with" and "contains"
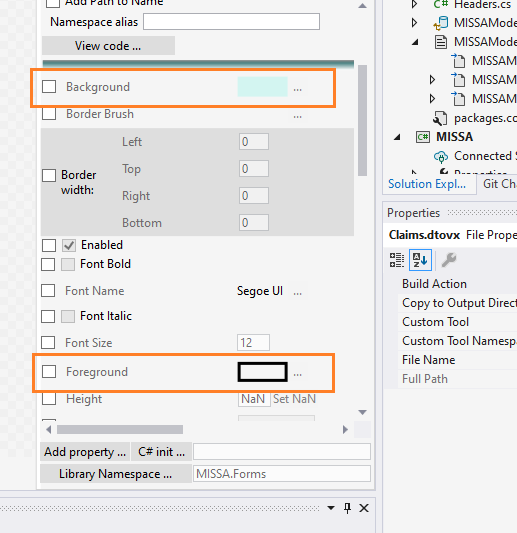
Initially all properties have inherited values and disabled. Click checkbox (check on) at left of the property to override value. Value control(s) becomes enabled. Ro reset value to the inherited simply set checkbox to off.
Common properties are shown in the scrolling area of the Control Properties panel. This are most often used properties, inherited from System.Windows.Controls.Control alass, and some specific for certain classes like: "Header" for ItemsControl, "Text" for TextBox and TextBlock and so.
Some of the main properties are represented in the not typical for WPF style. For example: Visibility (Collapsed) is represented as "Invisible" checkbox.
Specific format have all pproperties of typed: Thickness, Brush, Grid columns/rows definitions.
Represented as 4 separated value, which can be changed independently. For example, Margin

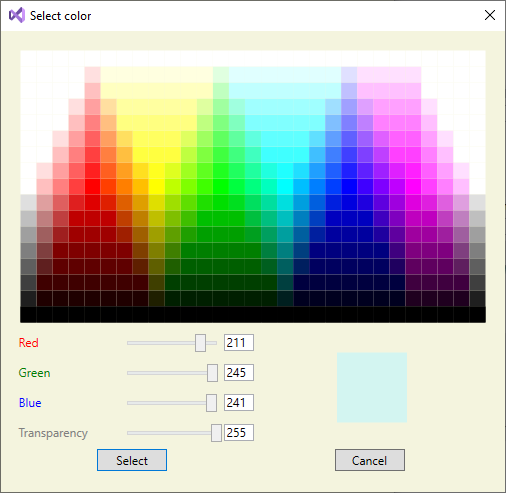
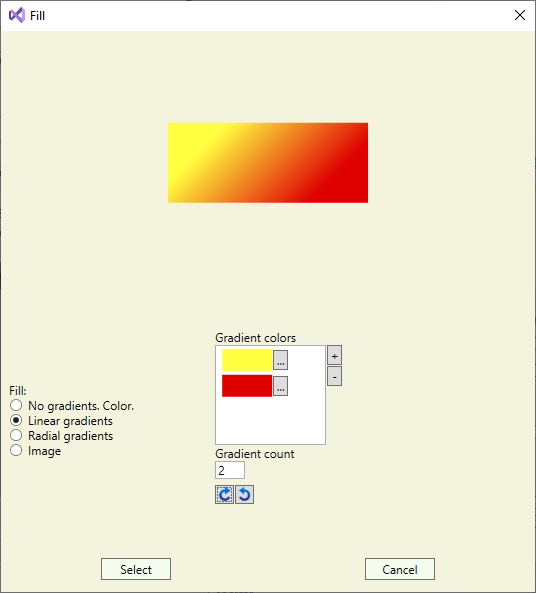
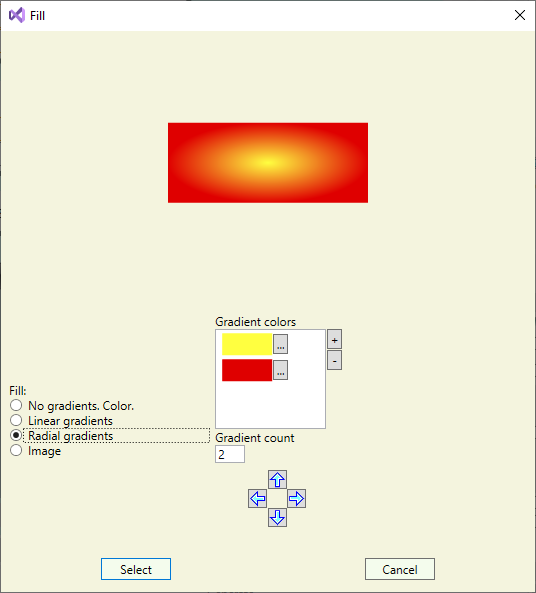
Represented as boxes with appropriate background or border colors and button "..." to call edit brush dialogs.
First level brush editing dialog allows to select the type of the brush.
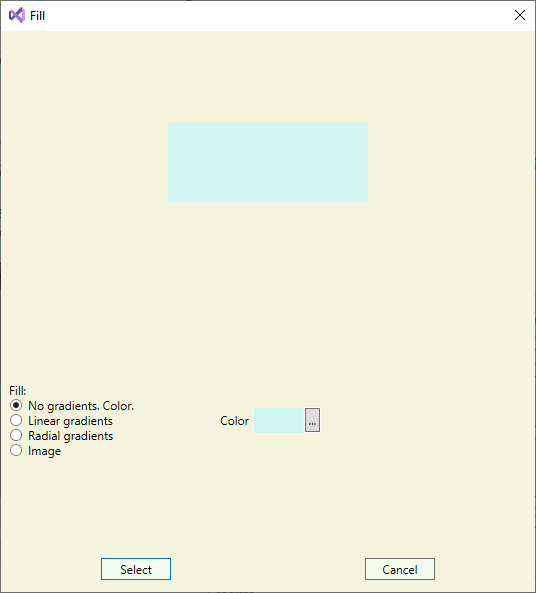
For no gradients brush (SolidcolorBrush) designer allows just to define a color.
In case of radial gradients dialog allows to define a set of colors and to rotate moving start/end point.
For radial gradients designer allows to move the center.
In case of image brush designer requires to select the image on the disk and to enter the full path of this image in the assembly.
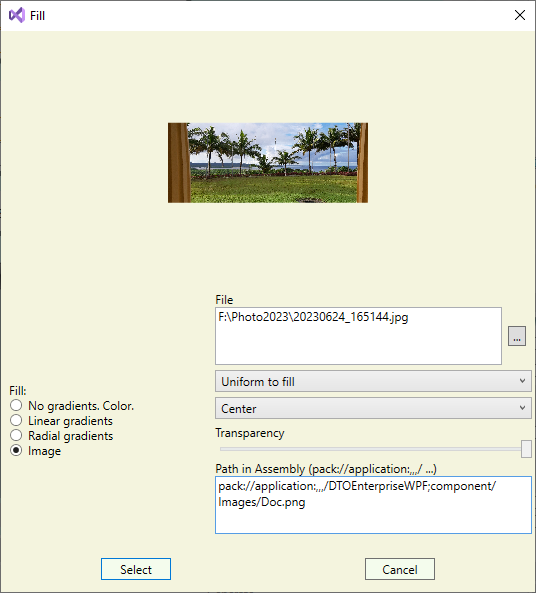
Two paths should be defined for each image: full path to the image file and full path in assembly. First is to show image in the DataOdyssey Visual designer, and the second - path in the assembly, where image included as resource.
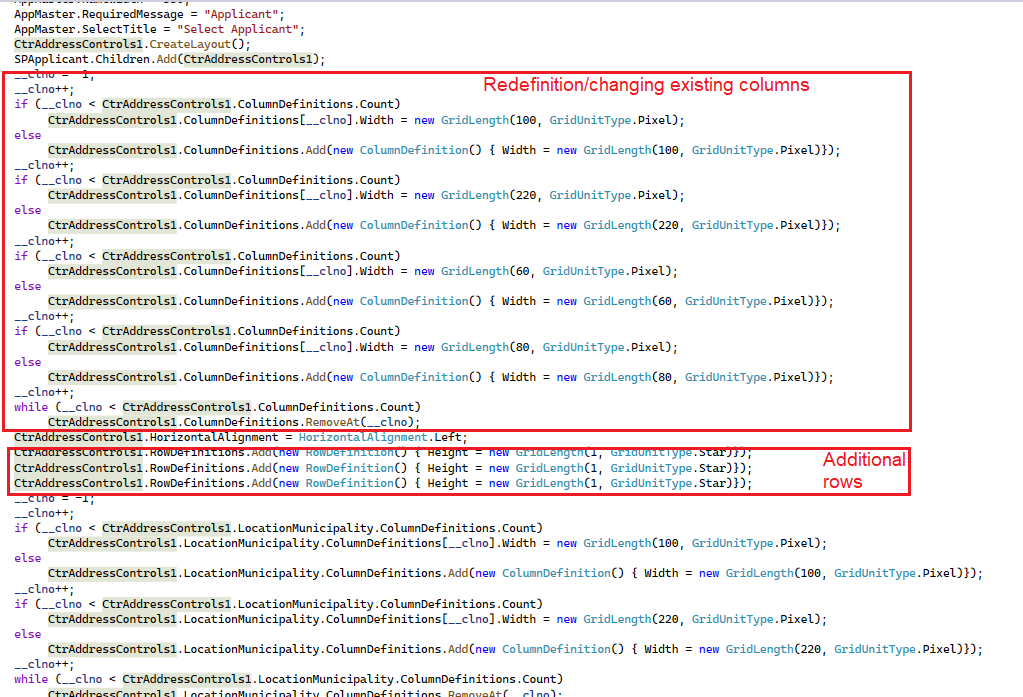
Two pairs of properties to define columns and two to define rows:
If designing control is not inherited, "additional" columns and rows definitions have not any sense. But when control is inherited, and you don't need to change existing columns/rows sizes and need to add another, "additional" definitions geve some advantaches.
Generated code becomes more simple and does not include checking of existing columns/rows, but simply adds new definitions.
You may simply redefine existing columns and rows, but c# code will be more complex.
Moreover, if columns/rows definitions will be changed for ancessor - changes get applied for children classes. Because of additional row/columns have not redefined them.
If neede property absence in the Control Properties area, click "Add property ..." button, find, select and clicl "Ok". Property appears in the Control Properties
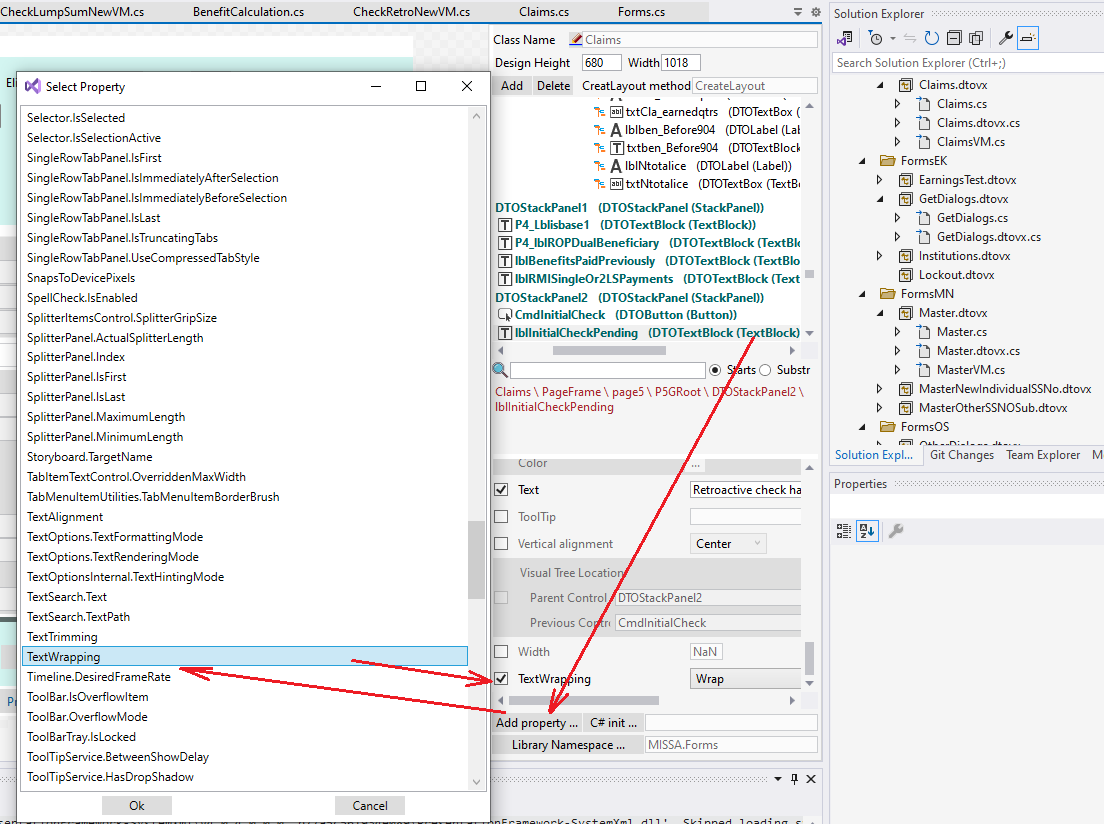
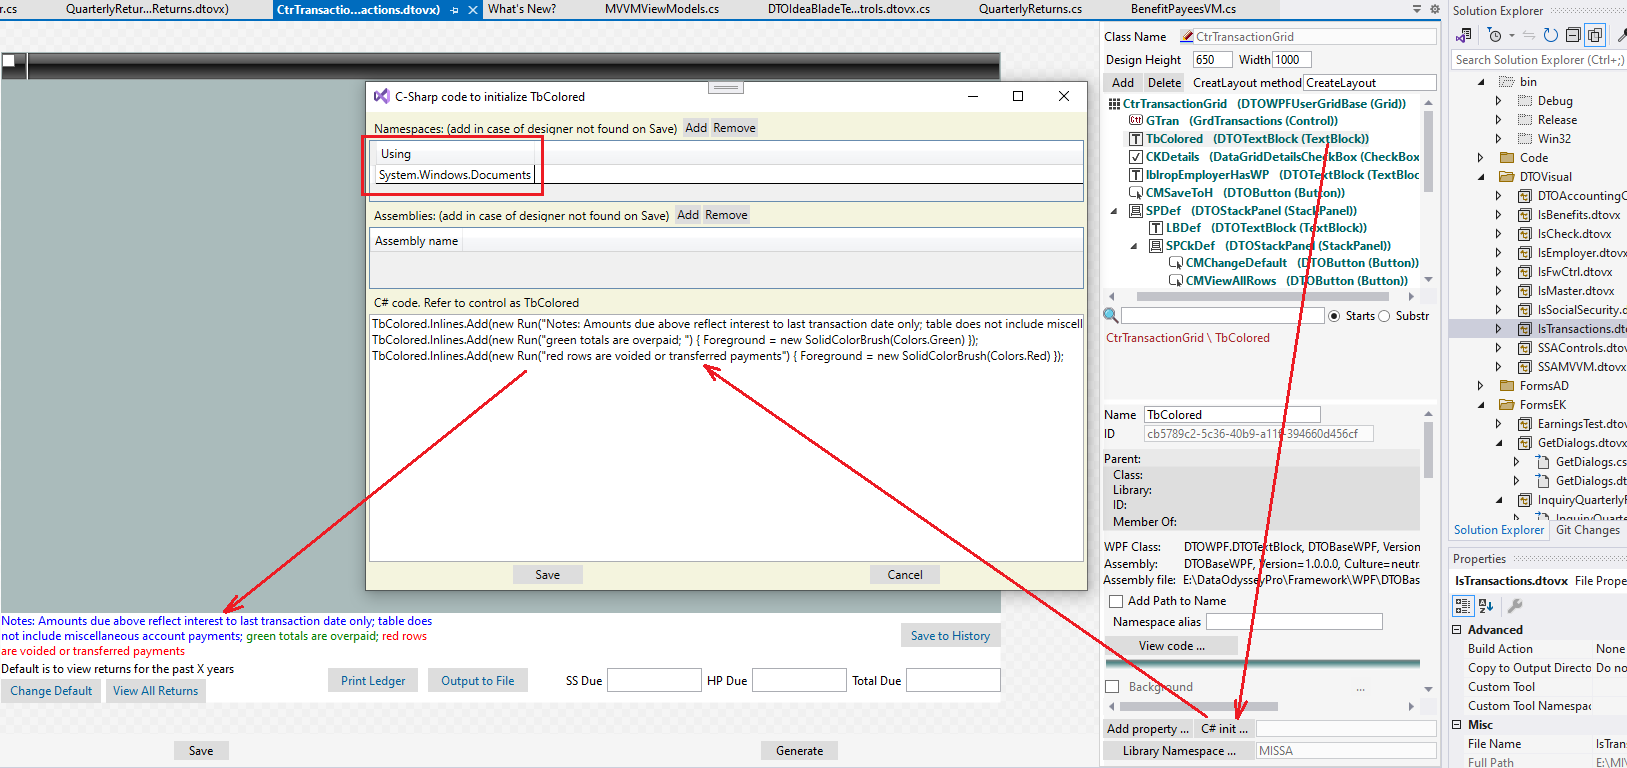
If some property has specific type (except primitive, Thickness, Brush or Enum), and you need to assign this property durin designing, the only way is to write few lines of c# code. For example:
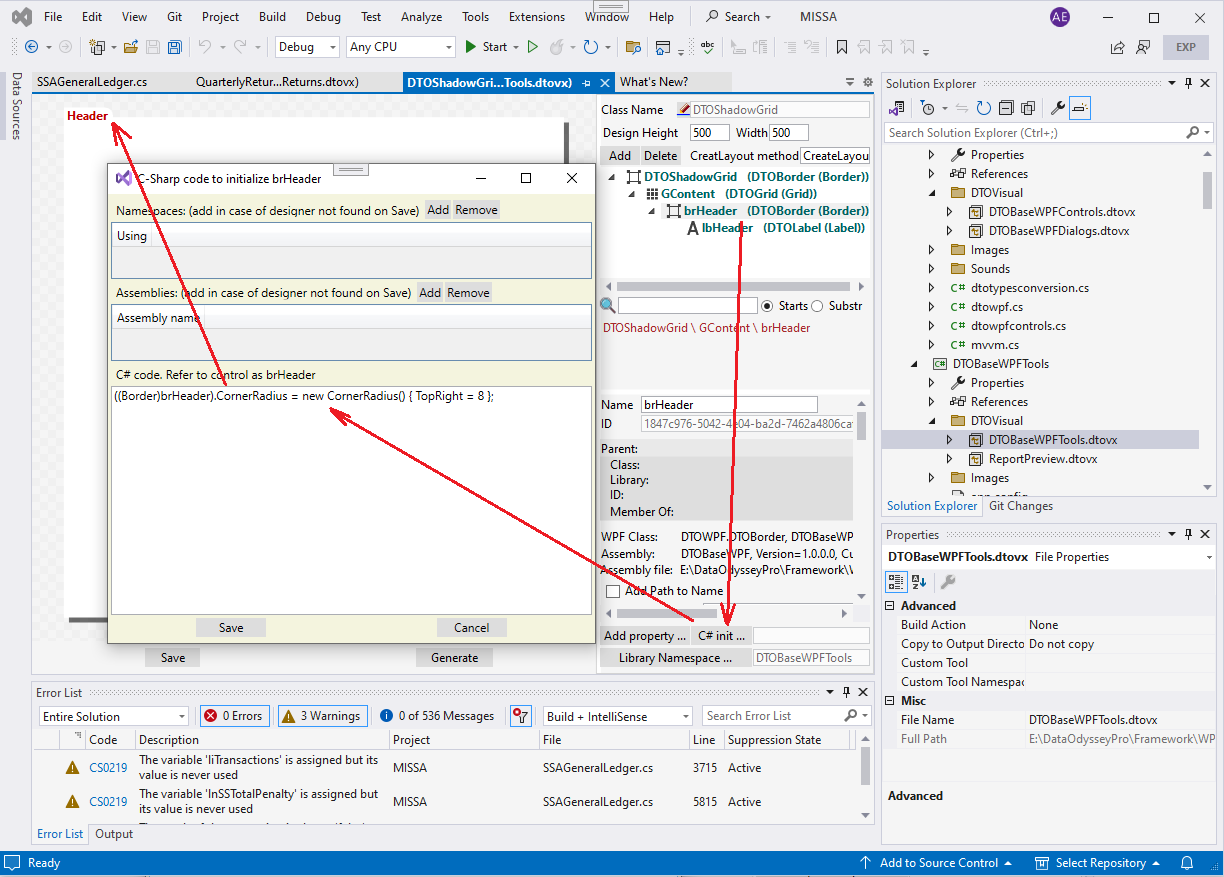
A good example of the "C# Init" code is TextBlock inlines.
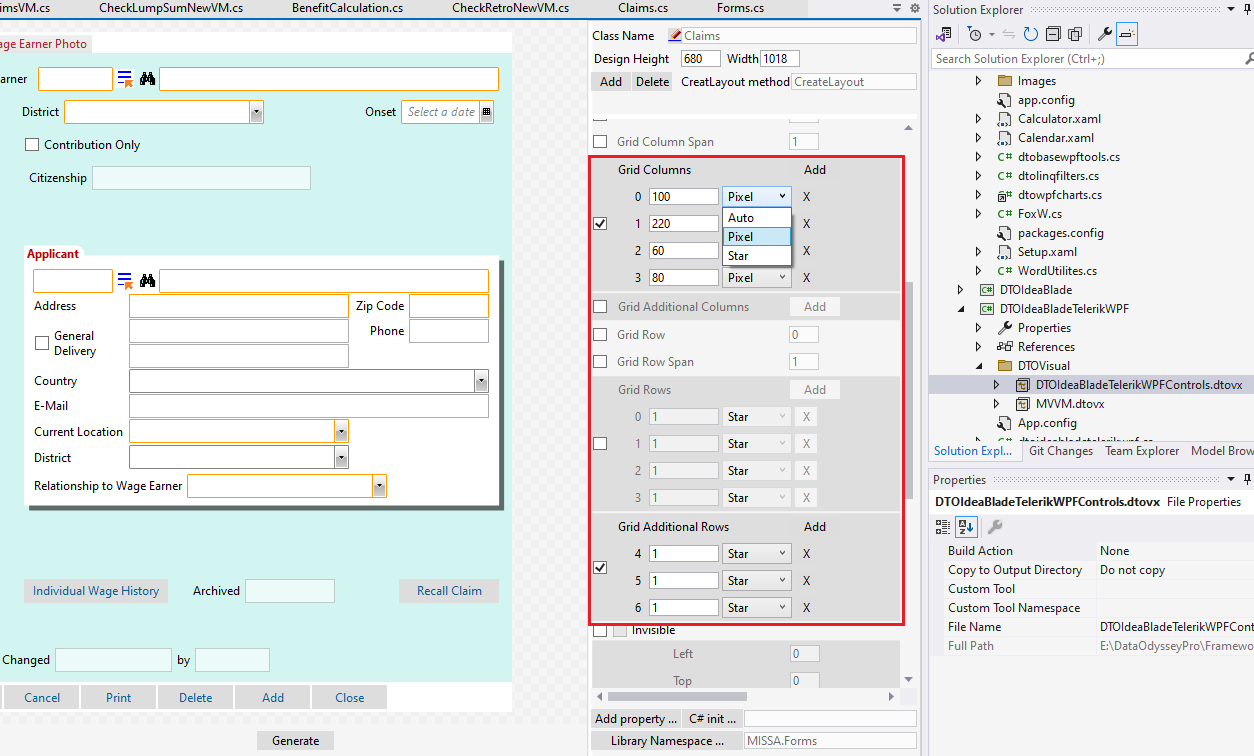
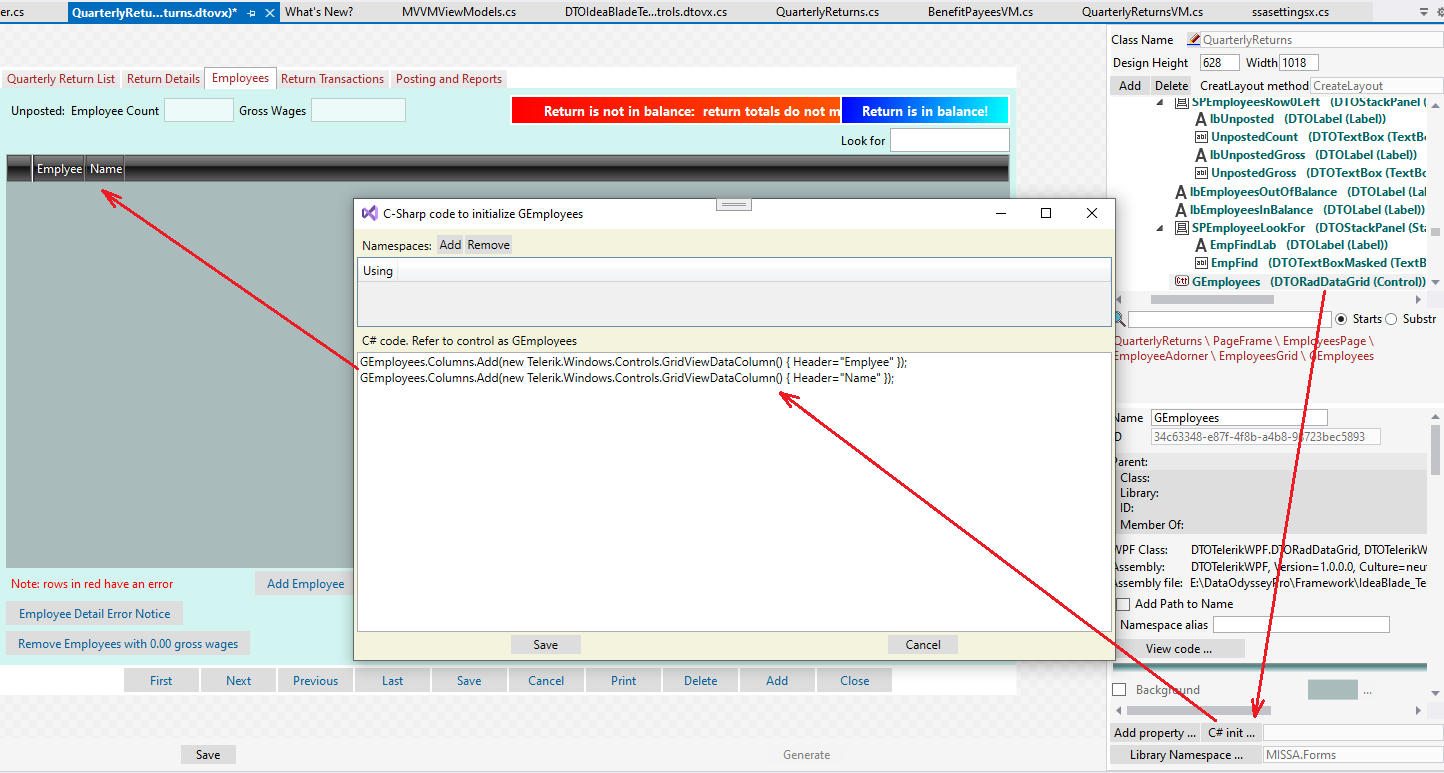
Another good example of the "C# Init" code is DataGrid columns adding. Telerik RsdGridView is shown on the picture below.
Drag and drop operation is allowed within Controls Tree of one window. Designer shows variants on "drop" event:
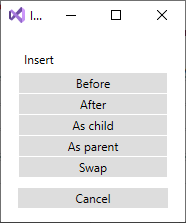
Also you may right click movable/source control, select "Cut" ("Copy" is to copy into another window), then right click destination control and select "Paste". The same dialog will appear.
Moving inherited subcontrols also allowed!
Right click source control, select "Copy", then go to another DataOdyssey Visual Designer window, select destination control, right click and select "Paste"
The same dialog appears
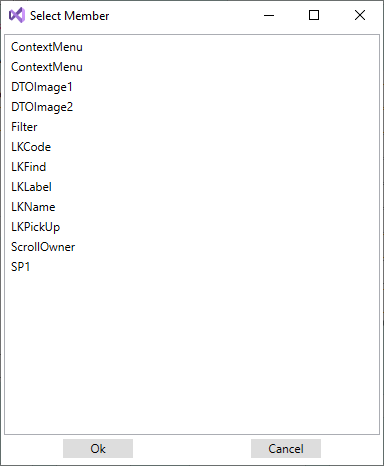
Controls, inherited from assembly types, are represented as a single item in the Controls Tree. Containig controls are not accessible initially. But this does not mean, that you can't change containing controls. If such need occurs do right click control and select "Extract Member ..."

Designer shous a list of containing controls to extract. Just select and click "Ok".
Extracted members are marked with italic fon style. You may change(override) their properties and even move withing Controls Tree.
Simply select control in the tree and click "Delete". Take care than there are no broken links.
Designer generates c# code each time when you save editing class. C# file has .dtovs.cs extension and attached to the .dtovx file in the project. There is separated "Generate" button which allows regenerate c# code if some problems occured during last saving.
All generated classes are declared as "partial". Proposed that the main behaviour of class will be written in another place as "partial" class.
But there is an opportunity to write code in the .dtovs.cs file detween directive "Add code below" lines.
By default designer generates commands of visual tree building not in the "Init" constructor, but in the separated "CreateLayout" method.
If ancessor already has virtual "CreateLayout" method the designer determine the return type and overrides this method.
If you need that designer generated separate(not overriden) method then you may change their name.
You can chane CreateLayout method name only if class is not inherited from another DataOdyssey Visual class.
To add new class into the existing library simply right click .dtovx class in the solution explorer and select "Add DataOdyssey Visual class". Then follow dialogs and do like when you create new class(see above).
We prefer to concentrate all related to .dtovx library c# files in one place and as attached to .dtovx in the VS project. The main behavior of classes should be attached as cs file with the same to library name.
In case of MVVM we add *VM.cs class to .dtovx too.
Right click .dtovx class in the solution explorer and select "".
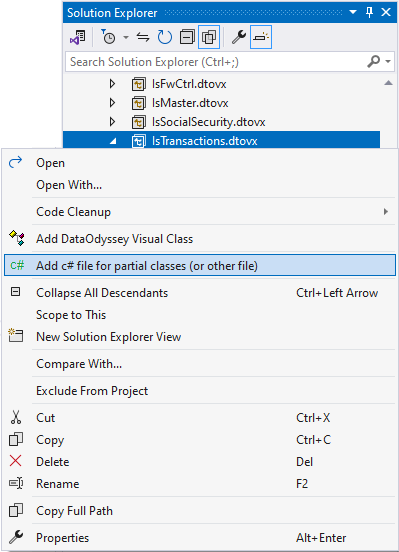
Dialog requests the name of a new C# file. And there is a button "Existing ..." which allows to add existing file of any type.


Simply doubleclick control in the Controls Tree or click "View Code ...". Designer will navigate to control definition in c# code.
To prevent sharing problems DataOdissey Visual Designer does not load assemplies directly. Visual Studio should be able to rebuild them in any time. Designer always makes copies of all DLLs in the subfolder of "Obj" folder. Each time before loadint designer compare times of DLL updating and copies DLL to the temporary file if existing temporary file is not actual.
Any error in controls, that you load into designer, causes Visual Studio crush!
Designer handles possible errors when load each control, but in theory not all errors can be handled. So, be careful and make sure that your WPF classes don't cause errors.
More difficult to handle all possible errors which can occur on control events raising. Designer area intercepts events:
and marks them as "Handled=true". But there are other events which can cause errors and VS crushing. So, be careful with your code.
To delete class from library you need open dialog with libraries list. Click "Add ..." button then "Inherit DTO Visual Class ...". Button fo remove class from the library is placced at right of each class item.
